Introduction:
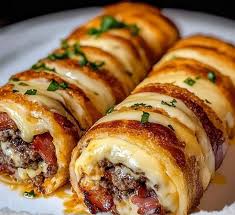
Garlic Butter Bacon Cheeseburger Rollups are an incredibly fun and flavorful twist on the classic cheeseburger! This recipe takes all the beloved components of a juicy cheeseburger – savory beef, crispy bacon, melted cheese, and of course, that signature garlic butter – and rolls them up in a soft, golden, and perfectly portable package. Imagine biting into a warm, buttery, and slightly chewy rollup filled with seasoned ground beef, crispy bacon crumbles, and ooey-gooey melted cheese, all infused with irresistible garlic butter flavor. These rollups are not just delicious; they’re incredibly fun to make and eat, making them perfect for parties, game days, family gatherings, or a special snack any time!
This recipe is all about maximizing flavor and fun while keeping the preparation process approachable and engaging. The dough is simple to make, providing a soft and slightly chewy base that perfectly complements the savory filling. The garlic butter element elevates the classic cheeseburger flavors, adding a layer of richness and aroma that is simply irresistible. These rollups are designed to be crowd-pleasers, easy to handle, and bursting with that classic cheeseburger taste that everyone loves, all in a convenient and delicious rollup form.
Whether you’re a seasoned home cook or just looking for a fun and easy recipe to try, Garlic Butter Bacon Cheeseburger Rollups are guaranteed to be a hit. Get ready to experience a culinary delight that’s both incredibly easy to make and utterly delicious to eat – a true flavor bomb in every rollup!
Why You’ll Love This Recipe:
You’ll absolutely love these Garlic Butter Bacon Cheeseburger Rollups because they are the perfect combination of flavor, fun, and ease. This recipe is designed to be both incredibly delicious and surprisingly simple to make, delivering maximum enjoyment with minimal fuss.
Firstly, the flavor is addictive! The combination of garlic butter, crispy bacon, savory ground beef, and melted cheese is a symphony of savory goodness. It’s that classic cheeseburger taste elevated with the richness of garlic butter and the irresistible crunch of bacon. Every bite is an explosion of flavor that you won’t be able to resist.
Secondly, they are incredibly fun and portable. The rollup format makes these cheeseburgers incredibly fun to eat and serve. They are perfect for parties, game days, picnics, or lunchboxes – anywhere you want a handheld, delicious treat that’s easy to manage and enjoy on the go.
Thirdly, they are surprisingly easy to make at home. Despite their gourmet flavor and appealing appearance, these cheeseburger rollups are quite simple to assemble. The dough is straightforward to make, and filling and rolling them is a fun and easy process, making this recipe accessible for bakers of all skill levels.
Finally, they are guaranteed to be a crowd-pleaser. Who can resist a warm, savory, buttery rollup filled with cheeseburger goodness and bacon? These Garlic Butter Bacon Cheeseburger Rollups are a guaranteed hit with both kids and adults, making them perfect for any occasion where you need a crowd-pleasing appetizer, snack, or even a light meal. This recipe is sure to become a new favorite for its flavor, fun factor, ease, and overall delicious baking experience!
INGREDIENTS YOU’LL NEED:
To create these savory and flavorful Garlic Butter Bacon Cheeseburger Rollups, you’ll need a selection of pantry-friendly and fresh ingredients. Each component plays a vital role in building the layers of flavor and achieving the perfect texture in these delightful handheld rollups. Let’s explore each ingredient and its contribution to the final recipe.
For the Rollup Dough:
Active dry yeast is the leavening agent that makes the dough rise and become light and airy. Active dry yeast needs to be activated in warm water to ensure it works properly.
Warm water (lukewarm) is used to activate the yeast and is the liquid base for the dough. Water should be lukewarm (around 105-115°F) to properly activate the yeast.
Granulated sugar provides food for the yeast to activate and adds a touch of sweetness to the dough. Sugar helps yeast activate and rise properly and adds subtle flavor.
Salt is essential for controlling the yeast activity and enhancing the overall flavor of the dough. Salt balances the sweetness and improves dough structure and flavor.
Vegetable oil or olive oil adds moisture and richness to the dough, making it soft and pliable. Oil contributes to a softer, more tender dough texture.
All-purpose flour is the main structural component of the dough, providing gluten and structure. All-purpose flour is readily available and works well for creating a soft and slightly chewy dough.
For the Garlic Butter Bacon Cheeseburger Filling:
Ground beef (80/20 or 85/15 recommended) is the protein base of the filling, providing savory flavor. Ground beef with some fat content (80/20 or 85/15) is recommended for juiciness and flavor.
Bacon, thick-cut, provides a smoky, savory flavor and textural contrast to the filling. Thick-cut bacon offers more substantial flavor and texture.
Garlic cloves, minced, are essential for adding a pungent and savory garlic flavor to the filling, highlighting the “Garlic Butter” theme. Fresh garlic is crucial for the best garlic flavor.
Yellow onion, finely diced, adds sweetness and aromatic depth to the savory filling base. Onion softens and adds sweetness and moisture to the filling.
Worcestershire sauce adds umami depth and savory complexity to the cheeseburger filling. Worcestershire sauce enhances the savory beef flavor.
Dijon mustard adds a tangy, slightly sharp and complex mustard flavor that complements beef and cheese. Dijon mustard adds a subtle tang and depth of flavor.
Cheddar cheese, shredded, provides a classic melty cheeseburger cheese flavor and creamy texture. Cheddar cheese is a classic cheeseburger cheese and melts well. Provolone, Monterey Jack or other melting cheeses can also be used.
Garlic powder enhances the garlic flavor in the filling, providing a more pronounced garlic note. Garlic powder intensifies the garlic flavor and ensures it’s well distributed.
Dried Italian seasoning adds a subtle herbaceous and savory background note that complements garlic and bacon. Italian seasoning adds a subtle savory and herbaceous depth.
Salt, preferably sea salt or kosher salt, is essential for seasoning and enhancing all the flavors in the filling.
Black pepper, freshly ground, adds a subtle spice and depth to the overall flavor profile.
For the Garlic Butter Topping:
Unsalted butter, melted, is the base for the garlic butter topping, providing richness and flavor. Unsalted butter allows you to control salt and provides clean buttery flavor.
Garlic cloves, minced, are essential for adding a pungent and savory garlic flavor to the topping, highlighting the “Garlic Butter” theme and enhancing the rollups’ aroma. Fresh garlic is crucial for the best garlic flavor.
Fresh parsley, chopped (optional, for garnish) adds freshness and a pop of color to the finished rollups. Fresh parsley brightens the flavors and adds a vibrant garnish.
HOW TO MAKE “Garlic Butter Bacon Cheeseburger Rollups”:
Making Garlic Butter Bacon Cheeseburger Rollups involves several key stages: preparing the dough and letting it rise, cooking the garlic butter bacon cheeseburger filling, assembling the rollups by filling dough portions and rolling, proofing the assembled rollups, baking them to golden perfection, and finally, brushing with garlic butter topping and serving warm. Let’s outline the general method to understand the flow of the recipe.
First, you will make the dough. Yeast is activated, then wet and dry ingredients are combined to form a soft dough, which is kneaded and left to rise until doubled. Preparing dough and allowing it to rise is essential for soft, airy rollups.
Next, you will cook the garlic butter bacon cheeseburger filling. Bacon is cooked until crispy, then ground beef is browned with onion and garlic. Flavorings like Worcestershire sauce, Dijon mustard, garlic powder, Italian seasoning, salt, and pepper are added, followed by shredded cheddar cheese. Cooking and flavoring filling to create the cheeseburger component.
Then, you will assemble the rollups. Risen dough is rolled out into a rectangle, spread with the cheeseburger filling and crispy bacon bits, rolled up jelly-roll style, and then sliced into individual rollups. Assembling rollups by spreading filling on dough, rolling, and slicing.
After assembling, you will proof the rollups. Assembled cheeseburger rollups are allowed to proof for a short period to rise slightly before baking. Proofing allows for a final rise before baking, resulting in lighter texture.
Then, you will bake and brush with garlic butter. Proofed rollups are baked in a preheated oven until golden brown. Immediately after baking, they are generously brushed with garlic butter topping. Baking transforms dough into golden brown rollups and cooks filling. Garlic butter topping is brushed on hot rollups for maximum flavor absorption.
Finally, you will cool slightly and serve. Baked Garlic Butter Bacon Cheeseburger Rollups are cooled slightly and served warm. Cooling slightly makes them easier to handle and eat. Serving warm is best for enjoying melty cheese, soft dough, and garlic butter aroma. Enjoy!
STEP-BY-STEP INSTRUCTIONS:
Let’s delve into a more detailed, step-by-step guide for preparing your Garlic Butter Bacon Cheeseburger Rollups. Each step is broken down further to provide clarity and ensure even beginner cooks can confidently create these savory and delightful rollups at home.
Part 1: Making the Rollup Dough
Step 1: Activate Yeast.
In a large mixing bowl, or the bowl of a stand mixer, combine warm water (lukewarm, about 105-115°F) and active dry yeast. Let it stand for 5-10 minutes, or until foamy, indicating the yeast is active. Activating yeast ensures dough will rise properly. Foamy yeast mixture confirms yeast is active.
Step 2: Combine Wet Ingredients.
To the yeast mixture, add granulated sugar, salt, and vegetable oil (or olive oil). Stir to combine. Wet ingredients are added to activated yeast.
Step 3: Gradually Add Flour and Knead Dough.
Gradually add all-purpose flour, about ½ cup at a time, mixing after each addition, until a shaggy dough forms. If using a stand mixer, use the dough hook. Once a shaggy dough forms, turn the dough out onto a lightly floured surface and knead for 5-7 minutes, or until the dough is smooth and elastic. Alternatively, continue kneading in the stand mixer on low speed for 5-7 minutes. Dough should be kneaded until smooth and elastic. Kneading develops gluten for dough structure.
Step 4: First Rise (Proofing).
Place the kneaded dough in a lightly oiled bowl, turning to coat the dough in oil. Cover the bowl with plastic wrap or a clean kitchen towel. Let it rise in a warm place for 1-1.5 hours, or until the dough has doubled in size. First rise allows dough to double in size due to yeast activity. Doubled dough indicates sufficient rise.
Part 2: Preparing the Garlic Butter Bacon Cheeseburger Filling
Step 1: Cook Bacon Until Crispy.
In a large skillet, cook thick-cut bacon over medium heat until crispy. Remove bacon from the skillet with a slotted spoon and set aside on paper towels to drain. Reserve about 1 tablespoon of bacon fat in the skillet. Cooking bacon first provides crispy bacon and rendered bacon fat for flavor. Reserve bacon fat for cooking ground beef.
Step 2: Brown Ground Beef with Onion and Garlic.
In the same skillet with the reserved bacon fat, add ground beef and finely diced yellow onion. Cook over medium-high heat, breaking up the beef with a spoon, until the beef is browned and the onion is softened, about 6-8 minutes. Drain off any excess grease. Browning ground beef develops savory flavors. Draining grease prevents filling from being too greasy.
Step 3: Add Flavorings and Cheese.
Stir in minced garlic, Worcestershire sauce, Dijon mustard, garlic powder, Italian seasoning, salt, and black1 pepper to the skillet with the browned beef and onions. Cook for 1 minute more until fragrant. Then, remove from heat and stir in shredded cheddar cheese until melted and well combined. Adding flavorings and cheese to complete filling. Melting cheese binds filling together.
Step 4: Crumble Bacon for Filling.
Crumble the cooked bacon into smaller pieces. Crumbled bacon is easier to incorporate into filling.
Part 3: Assembling the Garlic Butter Bacon Cheeseburger Rollups
Step 1: Preheat Oven and Prepare Baking Sheets.
Preheat oven to 375°F (190°C). Line baking sheets with parchment paper. Preheat oven ensures correct baking temperature. Parchment paper prevents sticking and easy cleanup.
Step 2: Roll Out Dough.
Once the dough has doubled in size, punch down the dough gently to release air. Turn the dough out onto a lightly floured surface. Using a rolling pin, roll the dough into a large rectangle, approximately 12×16 inches. Rolling dough into a rectangle for even filling and rolling up. Rectangle shape makes rolling and slicing easier.
Step 3: Spread Filling and Bacon.
Evenly spread the garlic butter bacon cheeseburger filling over the rolled-out dough rectangle, leaving a small border (about ½ inch) along one long edge for sealing. Sprinkle the crumbled crispy bacon evenly over the filling. Spreading filling evenly ensures consistent flavor in each rollup. Leaving a border aids in sealing the rollup.
Step 4: Roll Up Dough.
Starting from the long edge opposite the border, tightly roll up the dough jelly-roll style, enclosing the filling as you go. Pinch the seam to seal the rollup log. Rolling tightly ensures compact rollups. Pinching seam prevents filling from leaking.
Step 5: Slice into Rollups.
Using a sharp knife or pizza cutter, slice the rollup log into 12 equal portions (about 1-inch thick). Slicing into equal portions for consistent rollup size.
Step 6: Place Rollups on Baking Sheets.
Place the sliced rollups swirl-side up on the prepared baking sheets, spacing them about 2 inches apart. Spacing allows room for rollups to expand during proofing and baking.
Part 4: Proofing, Baking, and Garlic Butter Topping
Step 1: Second Rise (Proofing Assembled Rollups).
Cover the baking sheets with a clean kitchen towel or plastic wrap loosely. Let the assembled rollups proof in a warm place for 20-30 minutes, or until they have slightly puffed up. Second proofing allows rollups to slightly rise before baking. Puffed rollups indicate sufficient proofing.
Step 2: Bake Rollups.
Bake in the preheated oven for 20-25 minutes, or until the rollups are golden brown and the dough is cooked through. Baking time may vary slightly depending on your oven. Bake until golden brown and dough is cooked through. Golden brown color indicates doneness.
Step 3: Prepare Garlic Butter Topping.
While rollups are baking, prepare the garlic butter topping. In a small bowl, melt unsalted butter. Stir in minced garlic. Prepare garlic butter topping while rollups bake. Melted butter and garlic create flavorful topping.
Step 4: Brush with Garlic Butter Topping.
As soon as the baked rollups are removed from the oven, generously brush the tops and sides of the hot rollups with the garlic butter topping. Brushing immediately after baking maximizes flavor absorption. Garlic butter topping enhances flavor and keeps crust soft.
Step 5: Garnish and Cool Slightly, Serve Warm.
If desired, garnish with fresh chopped parsley. Let the Garlic Butter Bacon Cheeseburger Rollups cool on the baking sheets for a few minutes before transferring them to a wire rack to cool slightly. Serve warm. Garnish adds freshness and visual appeal. Cooling slightly makes them easier to handle. Serve warm for best enjoyment of melty cheese, soft dough, and garlic butter aroma. Enjoy these savory rollups!
USEFUL TIPS:
To consistently create delicious Garlic Butter Bacon Cheeseburger Rollups, consider these helpful tips. These suggestions cover key aspects from dough making to filling, assembly, baking, and serving techniques, designed to elevate your rollup-making skills and ensure a flavorful outcome every time.
Use lukewarm water (105-115°F) to activate the yeast. Water that is too hot can kill the yeast, and water that is too cold may not activate it properly. Lukewarm water is ideal for yeast activation.
Knead the dough properly until smooth and elastic. Kneading develops gluten, which is essential for the dough to rise and have a good texture. Knead until dough is smooth and springs back when poked.
Let the dough rise in a warm place for proper doubling. A warm, draft-free place is essential for the yeast to work effectively and the dough to double in size. Warm environment speeds up yeast activity.
Don’t overfill the rollups. Overfilling can make them difficult to roll up and seal, and may cause filling to leak out during baking. Use a reasonable amount of filling for easy rolling and prevent leaking.
Seal the dough tightly when rolling up to prevent filling from leaking out during baking. Pinch the seam firmly to ensure the rollup log is well sealed. Proper sealing prevents filling from leaking during baking.
Slice rollups evenly for consistent baking and presentation. Slicing rollups into uniform thickness ensures they bake evenly and look appealing. Uniform slices promote even baking.
Proof the assembled rollups for a second rise before baking. A second proofing after assembly allows the rollups to puff up slightly, resulting in a lighter, more tender texture. Second proofing enhances texture.
Bake until golden brown and dough is cooked through. Bake the rollups until they are nicely golden brown all over, and the dough is fully cooked in the center. Golden brown color and firm dough indicate doneness.
Brush garlic butter topping generously immediately after baking. Brushing with garlic butter right after baking maximizes flavor absorption and keeps the crust soft and flavorful. Garlic butter is best applied hot.
Serve warm for the best texture and flavor, especially when cheese is melty and garlic butter is fragrant. Garlic Butter Bacon Cheeseburger Rollups are best enjoyed warm, right after baking, when the cheese is melty, the dough is soft, and the garlic butter is aromatic. Serve warm for optimal enjoyment.
DETAILS:
Let’s explore the specific details of this Garlic Butter Bacon Cheeseburger Rollups recipe. Understanding these details will help you plan your baking process and appreciate the elements that contribute to the recipe’s overall success and delightful characteristics.
Prep Time: Approximately 45 minutes (including filling prep and dough making). Prep time includes making dough, preparing cheeseburger filling, and chopping ingredients. Dough making and filling prep are primary prep time components.
Rise Time (Dough): 1-1.5 hours (for first rise), 20-30 minutes (for second proofing of assembled rollups). Rise times are passive but essential for dough texture. Factor in rise times when planning baking schedule.
Bake Time: Approximately 20-25 minutes per batch. Baking time is relatively short and done in batches if making a large quantity.
Cooling Time: 10-15 minutes (slight cooling before serving). Slight cooling makes rollups easier to handle and eat.
Total Time: Approximately 2 hours 15 minutes – 2 hours 40 minutes (including prep and rise times). This represents the combined active prep and passive rise/proof time, bake, and slight cooling time. Mostly passive rising and proofing time.
Yield: Approximately 12 rollups. This recipe is designed to yield about 12 rollups, a good amount for a party or small gathering. Yield can vary slightly based on rollup size.
Category: Appetizer, Snack, Party Food, Savory Baking, Cheeseburger Inspired, Rollups. Garlic Butter Bacon Cheeseburger Rollups clearly fall into the category of appetizers, snacks, party food, savory baking, and prominently feature cheeseburger and rollup elements.
Method: Baking, Yeast Dough, Filling & Rolling. The primary cooking method is baking. Yeast dough making is essential for texture. Filling and rolling are key techniques for this recipe.
Cuisine: American Fusion, Comfort Food, Savory. This dish is American fusion comfort food, taking classic cheeseburger flavors and presenting them in a fun baked rollup format.
Diet: Not specified (modifiable). This recipe, as written, is not specifically tailored to any particular diet. For a lower-carb version, this recipe is not easily modified with dough as a primary component. Consider smaller rollup sizes for portion control. For dairy-free, substitute plant-based butter alternative for both dough and topping, and use dairy-free cheese shreds (cheddar alternative). For gluten-free, gluten-free dough recipe and gluten-free all-purpose flour blend would be needed (significant recipe modification).
NOTES:
Consider these additional notes for making your Garlic Butter Bacon Cheeseburger Rollups even more personalized and successful. These insights provide flexibility and address potential variations, ingredient substitutions, and important considerations for different preferences and situations.
For a richer beef flavor, use a higher fat content ground beef, such as 70/30 or 75/25 blend. Higher fat ground beef will be juicier and more flavorful. Drain grease thoroughly after browning.
For a spicier filling, add a pinch of red pepper flakes to the beef mixture while cooking, or a dash of hot sauce to the filling after cooking. Adjust spice levels to your preference.
Cheese variations: experiment with different cheese combinations for the filling. Provolone cheese, Monterey Jack cheese, pepper jack cheese, or a blend of Italian cheeses can be used in addition to or instead of cheddar.
Vegetable variations: consider adding finely diced bell peppers, mushrooms, or caramelized onions to the cheeseburger filling for added flavor and texture. Sauté vegetables along with onions before adding ground beef.
For a make-ahead option, the cheeseburger filling can be made a day in advance and stored in the refrigerator. The dough can also be made a day ahead, allowed to rise in the refrigerator overnight (slower rise), and then brought back to room temperature and allowed to proof before assembly. Assembled, unbaked rollups can be proofed, then refrigerated (covered) for a few hours for slower proofing and baking later.
To ensure even baking, rotate the baking sheets halfway through the baking time. Rotating baking sheets helps ensure even browning and baking.
For a shiny crust, egg wash can be brushed on rollups before baking (optional). Egg wash enhances browning (optional).
FREQUENTLY ASKED QUESTIONS:
Let’s address some frequently asked questions about making Garlic Butter Bacon Cheeseburger Rollups. These answers are designed to provide clarity and solutions to common queries, ensuring a smooth and successful baking experience.
Q: Can I use pre-made dough to save time?
A: Yes, you can use store-bought pizza dough or bread dough to save time. If using pre-made dough, allow it to come to room temperature, then roll it out and proceed with filling, rolling, and baking as directed. Pre-made dough is a convenient shortcut but homemade dough offers best texture and flavor.
Q: Can I bake or air fry these cheeseburger rollups?
A: Yes, baking is the recommended method as described in the recipe. For air frying, you can air fry assembled and proofed cheeseburger rollups at 350°F (175°C) for approximately 10-12 minutes, or until golden brown and cooked through. Air frying will cook them faster and potentially yield a crispier exterior. Monitor closely when air frying as cooking times can vary by air fryer model. Baking provides more even and consistent cooking, especially for larger batches.
Q: My dough is sticky and difficult to handle. What should I do?
A: If your dough is too sticky, first ensure you have added the correct amount of flour. Sticky dough can also be due to humidity or slight variations in ingredient measurements. Try adding a tablespoon of flour at a time while kneading, until the dough is easier to handle and less sticky, but avoid adding too much flour as it can make the rollups dry. Lightly flour your hands and work surface when handling and shaping the dough to prevent sticking. Chilling the dough briefly (for about 15-20 minutes) can also help firm it up and make it easier to handle, though this dough is designed to be fairly soft.
Q: Can I make these rollups ahead of time and freeze them?
A: Yes, Garlic Butter Bacon Cheeseburger Rollups can be made ahead and frozen either baked or unbaked:
* To Freeze Unbaked: Assemble rollups, place them on a baking sheet lined with parchment paper, and freeze until solid. Once frozen, transfer to a freezer-safe bag or container. Bake from frozen, adding a few extra minutes to the baking time, until golden brown and cooked through.
* To Freeze Baked: Bake rollups completely, let them cool to room temperature. Wrap individually in plastic wrap, then place in a freezer-safe bag or container. Freeze for up to 1-2 months. Reheat from frozen or thawed in oven, air fryer, or microwave until heated through.
Q: How do I reheat leftover cheeseburger rollups?
A: Leftover Garlic Butter Bacon Cheeseburger Rollups can be reheated in several ways:
* Oven: Reheat in a preheated oven at 350°F (175°C) for about 10-15 minutes, or until heated through and slightly crisp. Oven reheating is best for maintaining texture.
* Air Fryer: Reheat in an air fryer at 320°F (160°C) for 5-8 minutes, or until heated through and crispy. Air fryer is good for crisping up exterior.
* Microwave: Microwave on medium power in short intervals until heated through, but the dough may become softer and less crispy. Microwave is quickest but texture may change slightly.
Q: Can I make these with different ground meat?
A: Yes, you can use different types of ground meat. Ground turkey, ground chicken, or ground pork can be substituted for ground beef. Ground turkey or chicken will result in a leaner filling. Ground pork will add a richer, slightly sweeter flavor. Adjust seasonings as needed to complement the meat choice.
STORAGE INSTRUCTIONS:
Proper storage is essential to maintain the quality and flavor of your leftover Garlic Butter Bacon Cheeseburger Rollups. Follow these instructions to ensure your rollups remain delicious and safe to eat even after being stored, although they are always best enjoyed fresh and warm.
Room Temperature Storage (Short Term, Not Recommended for Long Periods): Baked Garlic Butter Bacon Cheeseburger Rollups can be stored at room temperature for a very short period (a few hours) if you plan to consume them within the same day of baking, especially if kept in a cool, dry place. However, room temperature storage is not recommended for extended periods, especially if the environment is warm or humid, as it can affect food safety and dough texture.
Refrigeration (Recommended for Leftovers): Allow baked Garlic Butter Bacon Cheeseburger Rollups to cool completely to room temperature before storing. Once cooled, transfer the rollups to airtight containers or resealable plastic bags. Store in the refrigerator. Properly refrigerated cheeseburger rollups will last for up to 3-4 days. Refrigeration is recommended for food safety and maintaining quality beyond a few hours.
Reheating from Refrigeration: Reheat refrigerated Garlic Butter Bacon Cheeseburger Rollups in the oven, air fryer, or microwave (as detailed in FAQ section) until heated through and warmed to your liking. Oven or air fryer reheating is recommended for best texture retention.
Freezing for Longer Storage: For longer-term storage, freezing is recommended. Allow the baked rollups to cool completely to room temperature. Wrap each rollup individually in plastic wrap, then place them in a freezer-safe bag or container. Freezing them individually first prevents sticking. Frozen Garlic Butter Bacon Cheeseburger Rollups can be stored in the freezer for up to 1-2 months.
Thawing Frozen Rollups: To thaw frozen cheeseburger rollups, remove the desired number of rollups from the freezer and let them thaw overnight in the refrigerator or at room temperature for about 1-2 hours. Reheat thawed rollups using oven, air fryer, or microwave methods until heated through. Thawing before reheating generally yields better texture than baking directly from frozen.
RELATED RECIPES
If you enjoyed the savory, cheesy goodness and fun format of Garlic Butter Bacon Cheeseburger Rollups, you’ll surely appreciate these other related savory rollup recipes, cheeseburger-inspired dishes, and garlic butter flavored snacks and meals. These recipes offer similar crowd-pleasing qualities, comforting flavors, or feature cheesy and savory combinations in different and delicious ways.
Pizza Rollups (Classic Savory Rollups): For another popular savory rollup recipe, try Pizza Rollups. Pizza dough is filled with pizza sauce, mozzarella cheese, and pepperoni (or your favorite pizza toppings), rolled up and baked until golden and cheesy. Pizza Rollups are a classic and versatile savory rollup option.
Pepperoni Rolls (West Virginian Style Rollups): If you enjoy pepperoni and cheese in a roll, try Pepperoni Rolls. Dough is filled with pepperoni and mozzarella cheese, rolled up, and baked, offering a simpler, classic pepperoni and cheese filled roll, often enjoyed as a snack or light meal.
Chicken Bacon Ranch Rollups (Chicken and Bacon Savory Rolls): For a different flavor combination, try Chicken Bacon Ranch Rollups. Dough is filled with cooked chicken, bacon, cheddar cheese, and ranch dressing, rolled up and baked, offering a creamy, savory, and cheesy chicken and bacon filled roll.
Garlic Knots (Garlic Butter Doughy Snack): For a simpler garlic butter bread option, try Garlic Knots. Strips of pizza dough are tied into knots, baked, and then tossed in garlic butter and parmesan cheese, offering a classic garlicky and buttery bread snack.
Garlic Butter Steak Bites (Garlic Butter Flavor with Steak): If you enjoyed the garlic butter flavor, try Garlic Butter Steak Bites. Steak cubes are pan-seared and then tossed in a rich garlic butter sauce, offering a savory and flavorful appetizer or main course with similar garlic butter flavor.
CONCLUSION
Garlic Butter Bacon Cheeseburger Rollups are more than just a fun and flavorful appetizer or snack; they are a savory delight that combines the best of cheeseburgers with the irresistible allure of garlic butter and bacon. With their soft, golden dough, juicy garlic butter bacon cheeseburger filling, and generous garlic butter topping, this recipe delivers a deeply satisfying and crowd-pleasing experience that’s perfect for any occasion, from casual gatherings to game day celebrations or fun family snacks. The straightforward steps and make-ahead options ensure that even novice bakers can confidently create these savory rollups in their own kitchens, making them perfect for sharing, gifting, or simply enjoying as a truly special homemade treat.
This recipe provides a clear and detailed guide, ensuring that even beginner cooks can confidently recreate these savory and flavorful rollups in their own kitchens. From mastering the yeast dough and preparing the flavorful garlic butter bacon cheeseburger filling to assembling and baking the rollups to golden perfection and brushing with garlic butter for extra flavor, each step is designed for ease and maximum enjoyment. Imagine the satisfaction of serving these beautifully browned Garlic Butter Bacon Cheeseburger Rollups, the inviting aroma filling your home, and the happy smiles as everyone savors each warm, savory, cheesy, bacon-y, garlicky, and utterly delicious bite of these handheld delights.
Whether you’re looking for a show-stopping appetizer for a party, a fun and flavorful snack for the family, a unique and delicious game day food, or simply crave a truly satisfying and savory baked treat, Garlic Butter Bacon Cheeseburger Rollups are a recipe that promises to become a cherished favorite. They are versatile, wonderfully delicious, and remarkably rewarding to make – embodying all the qualities of a perfect easy and crowd-pleasing savory baked dish. So gather your ingredients, preheat your oven, and embark on the delightful journey of making your own Garlic Butter Bacon Cheeseburger Rollups. You’re just moments away from creating a truly magnificent and deliciously satisfying culinary experience that will be savored and appreciated by all.
